
Guitar Care & Maintenance
How to Change Guitar Strings: Complete Step-by-Step Guide for Beginners

Changing guitar strings is one of the most important maintenance skills every guitarist should learn. Fresh strings can make your guitar sound brighter, feel smoother, stay in tune better, and respond more clearly to your playing.
Old strings can make even a good guitar feel dull. They may sound lifeless, feel rough, lose tuning stability, or collect sweat and dirt. If your guitar feels harder to play than usual, sounds flat, or will not stay in tune, changing the strings is often the first thing you should do.
This guide explains how to change guitar strings properly, including when to change them, what tools you need, how to remove old strings, how to install new strings, how to stretch them, and how to avoid common restringing mistakes.

Why Changing Guitar Strings Matters
Guitar strings are not permanent parts. Every time you play, your fingers leave sweat, oil, dirt, and moisture on the strings. Over time, this buildup affects tone, feel, tuning, and playability.
Old strings can cause:
- Dull tone
- Poor sustain
- Rough playing feel
- Tuning instability
- Intonation problems
- Corrosion or rust
- More finger noise
- Reduced brightness
- Harder bends
- Breakage during playing
Fresh strings can immediately make your guitar feel more responsive. Chords sound clearer, bends feel smoother, and notes have more life.
Changing strings also gives you a good chance to clean the fretboard, polish the frets, inspect the bridge, check the tuners, and wipe down areas that are normally hard to reach.

How Often Should You Change Guitar Strings?
How often you should change guitar strings depends on how much you play, how much your hands sweat, and what tone you prefer.
A casual player may change strings every few months. A frequent player may change them every few weeks. A touring or recording guitarist may change strings much more often.
General string-changing guideline
For most electric guitar players:
- Light playing: every 2–4 months
- Regular playing: every 4–8 weeks
- Heavy playing: every 1–3 weeks
- Recording or performance: before important sessions or shows
- If strings feel rusty or sound dead: change them immediately
You may need to change strings sooner if you live in a humid climate, sweat heavily, use uncoated strings, or play every day.
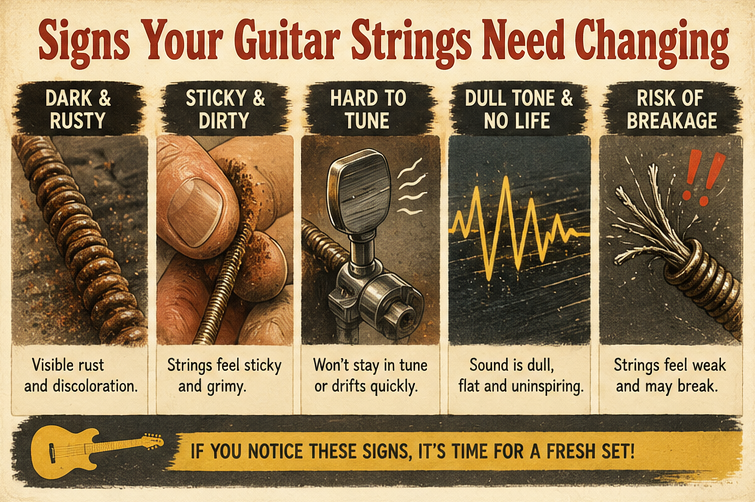
Signs Your Guitar Strings Need Changing
You do not always need a calendar to know when strings are old. Your guitar will usually tell you.
Your strings may need changing if:
- They sound dull or flat
- They feel rough, sticky, or dirty
- They look dark, rusty, or discolored
- They are harder to tune
- They lose brightness quickly
- They break easily
- They feel uneven under your fingers
- Chords sound less clear
- Intonation seems off
- Bends feel scratchy
- The guitar no longer feels inspiring to play
If wiping the strings no longer improves the feel or sound, it is time for a new set.
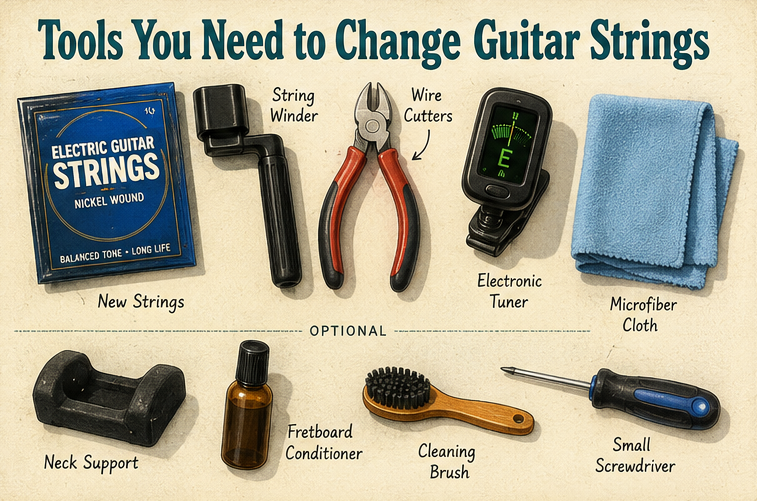
Tools You Need to Change Guitar Strings
Changing strings does not require many tools, but the right tools make the process easier and cleaner.
Basic tools
- New set of guitar strings
- String winder
- Wire cutters
- Electronic tuner
- Microfiber cloth
Helpful optional tools
- Neck support or folded towel
- Guitar polish
- Fretboard conditioner for unfinished rosewood, ebony, or pau ferro
- Soft brush
- String stretcher tool
- Nut lubricant
- Small screwdriver if your bridge or locking system needs it
You can change strings without a string winder, but it takes longer. Wire cutters are strongly recommended because long string ends can be sharp and messy.
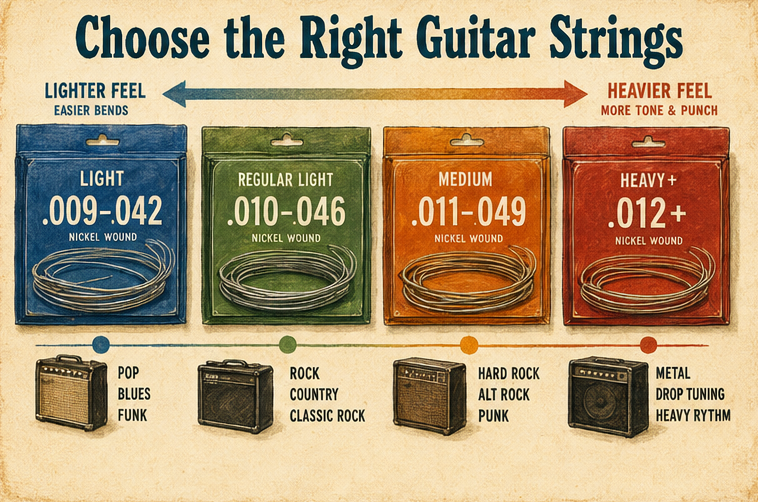
Choose the Right Guitar Strings
Before changing strings, choose the correct string type and gauge.
String gauge means string thickness. Thinner strings feel easier to bend, while thicker strings feel tighter and can provide a stronger feel for lower tunings.
Common electric guitar string gauges
Gauge | Feel | Best For |
|---|---|---|
.009–.042 | Light and easy to bend | Beginners, lead playing, standard tuning |
.010–.046 | Balanced standard feel | Rock, blues, pop, general playing |
.011–.049 | Heavier and stronger | Blues, hard rock, lower tunings |
.012 and above | Very firm feel | Jazz, slide, low tunings, heavy attack |
For most beginners and general electric guitar players, .009–.042 or .010–.046 is a safe choice.
Changing to a very different gauge may require a guitar setup. Heavier strings create more tension and may change neck relief, action, and intonation.

Before You Start: Know Your Bridge Type
Different electric guitars use different bridge systems. The restringing process is similar, but not exactly the same.
Common bridge types include:
- Fixed bridge
- Tune-o-matic bridge
- String-through-body bridge
- Standard tremolo bridge
- Locking tremolo bridge
- Floating tremolo bridge
- Bigsby-style vibrato
A fixed bridge is usually the easiest to restring. A locking tremolo or floating bridge can be more complicated because string tension affects bridge balance.
If your guitar has a floating tremolo, you may want to change one string at a time instead of removing all strings at once. This helps keep bridge tension more stable.
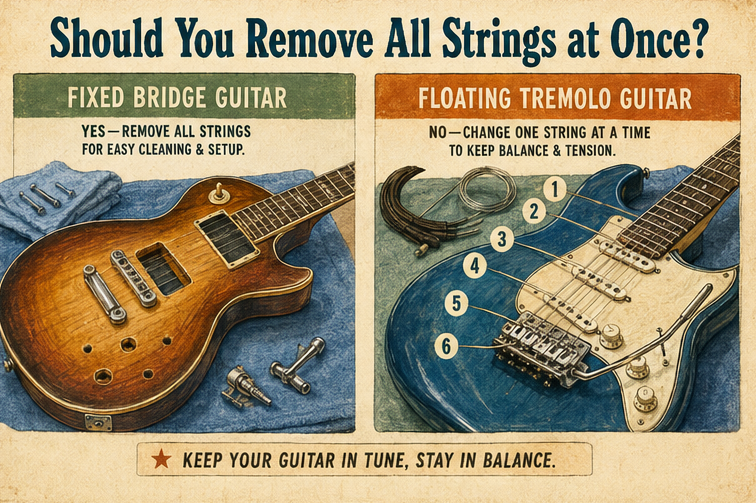
Should You Remove All Strings at Once?
Many players wonder whether it is safe to remove all strings at once.
For most fixed bridge guitars, it is fine to remove all strings at the same time. This gives you better access for cleaning the fretboard and body.
However, for floating tremolo guitars, removing all strings at once can cause the bridge to shift backward or collapse into the cavity. It is not usually dangerous, but it can make restringing and tuning more difficult.
Remove all strings at once if:
- Your guitar has a fixed bridge
- You want to clean the fretboard deeply
- You are comfortable restringing
- Your bridge parts will not fall out easily
Change one string at a time if:
- Your guitar has a floating tremolo
- You want to maintain bridge balance
- You are a beginner
- You are worried about bridge movement
- Your guitar has loose bridge parts
Both methods can work. Choose the method that fits your guitar and comfort level.

Step 1: Prepare Your Guitar
Place your guitar on a stable surface. Use a soft towel, guitar mat, or clean cloth to protect the finish.
Support the neck with a neck rest or folded towel. Make sure the guitar is stable before you begin.
Before removing strings, take a quick photo of the bridge and string path if you are not familiar with your guitar. This is especially useful for tremolo bridges, wraparound bridges, and locking systems.
Also make sure your new strings are ready and organized by gauge.
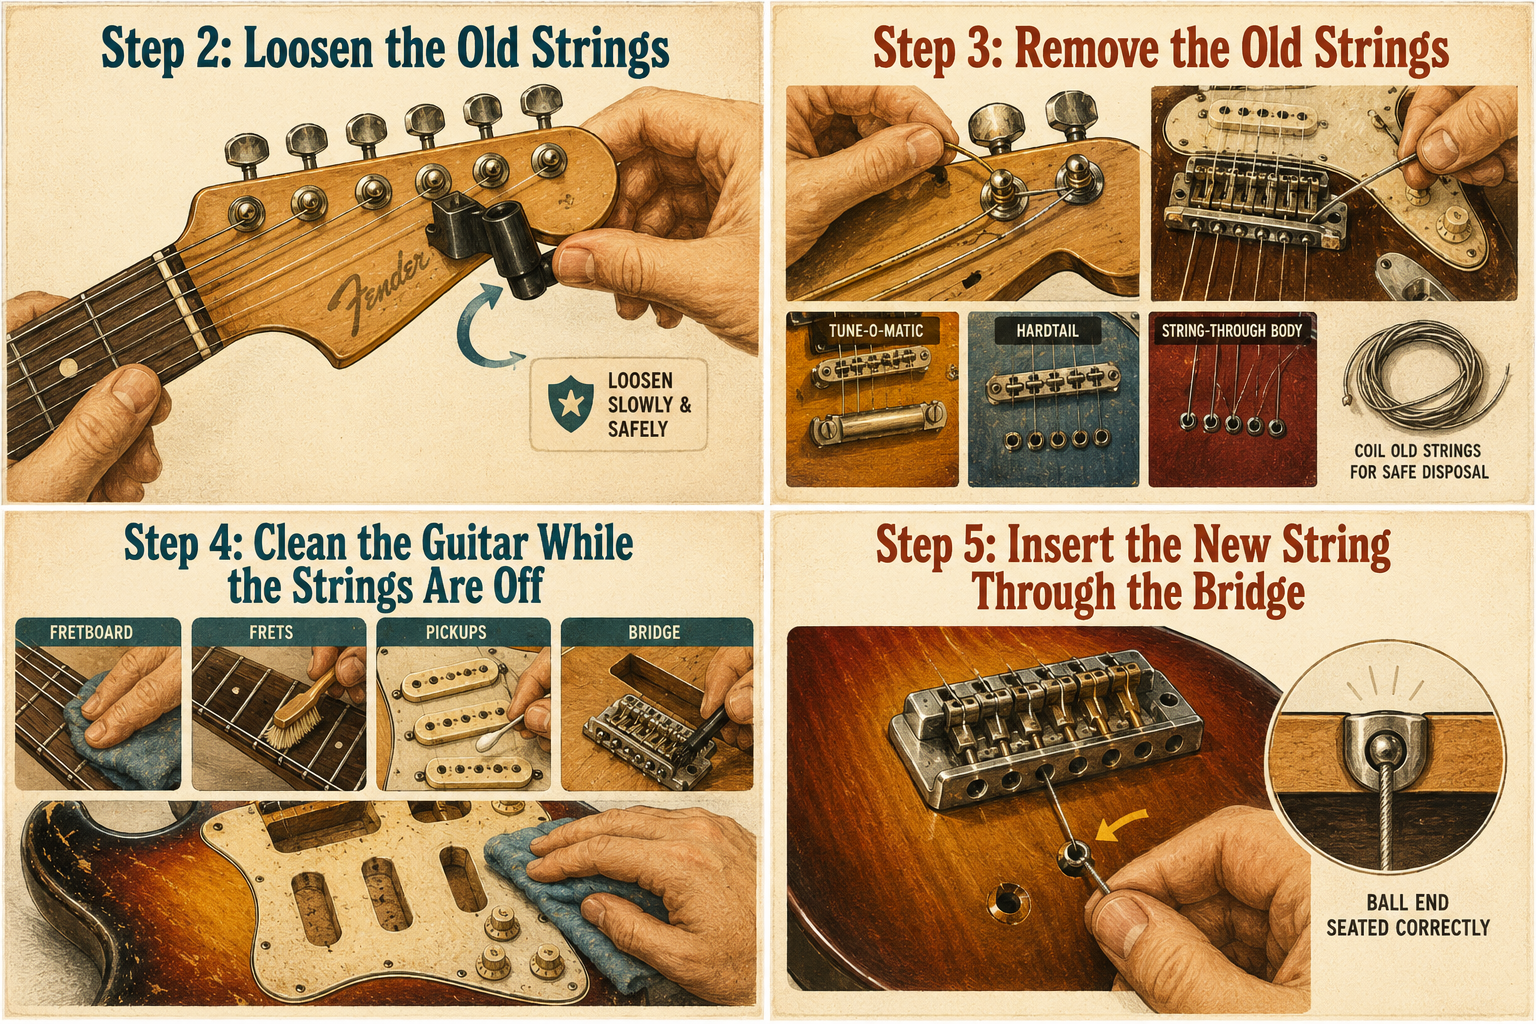
Step 2: Loosen the Old Strings
Use a tuner peg or string winder to loosen each string.
Turn the tuning key until the string becomes loose and floppy. Do not cut a string while it is still under full tension. Cutting a tight string can be dangerous and may cause the string to snap suddenly.
Loosen the string first, then cut or remove it.
If you are changing all strings at once, loosen all six strings before cutting or removing them.
Step 3: Remove the Old Strings
After the strings are loose, remove them from the tuning posts and bridge.
The removal method depends on the bridge.
Fixed bridge
Pull the strings out from the bridge or through the back of the body.
Tune-o-matic bridge
Remove the strings from the tailpiece. Be careful because the bridge or tailpiece may become loose when strings are removed.
String-through-body bridge
Pull the strings out through the back of the guitar.
Tremolo bridge
Remove the strings from the bridge block or back cavity, depending on the design.
Locking tremolo
Unlock the nut first, loosen the fine tuners if needed, then release the strings from the bridge saddles using the correct Allen key.
Roll up old strings carefully before throwing them away. String ends are sharp and can scratch your guitar or poke your hands.
Step 4: Clean the Guitar While the Strings Are Off
With the strings removed, this is the best time to clean areas that are normally difficult to reach.
You can clean:
- Fretboard
- Frets
- Pickups
- Bridge
- Saddles
- Control area
- Headstock
- Tuning machines
- Body surface
Use a dry microfiber cloth first. If needed, use guitar-safe cleaner on the body, but apply it to the cloth rather than spraying directly onto the guitar.
For unfinished rosewood, ebony, or pau ferro fretboards, you may use a small amount of guitar-safe fretboard conditioner if the board looks dry. Do not use lemon oil on finished maple fretboards.
Avoid using too much liquid near pickups, electronics, unfinished wood, or bridge screws.
Step 5: Insert the New String Through the Bridge
Start with one string at a time.
Take the correct string and insert it through the bridge or body.
For string-through-body guitars
Feed the string through the back of the guitar until it comes out over the bridge saddle.
For top-loading bridges
Insert the string through the bridge from the back or front depending on the design.
For tune-o-matic tailpieces
Feed the string through the tailpiece and guide it over the bridge saddle.
For tremolo bridges
Feed the string through the bridge block from the back cavity or through the bridge top, depending on the tremolo design.
Make sure the ball end is seated properly. If the ball end is not seated, the string may slip later and cause tuning problems.
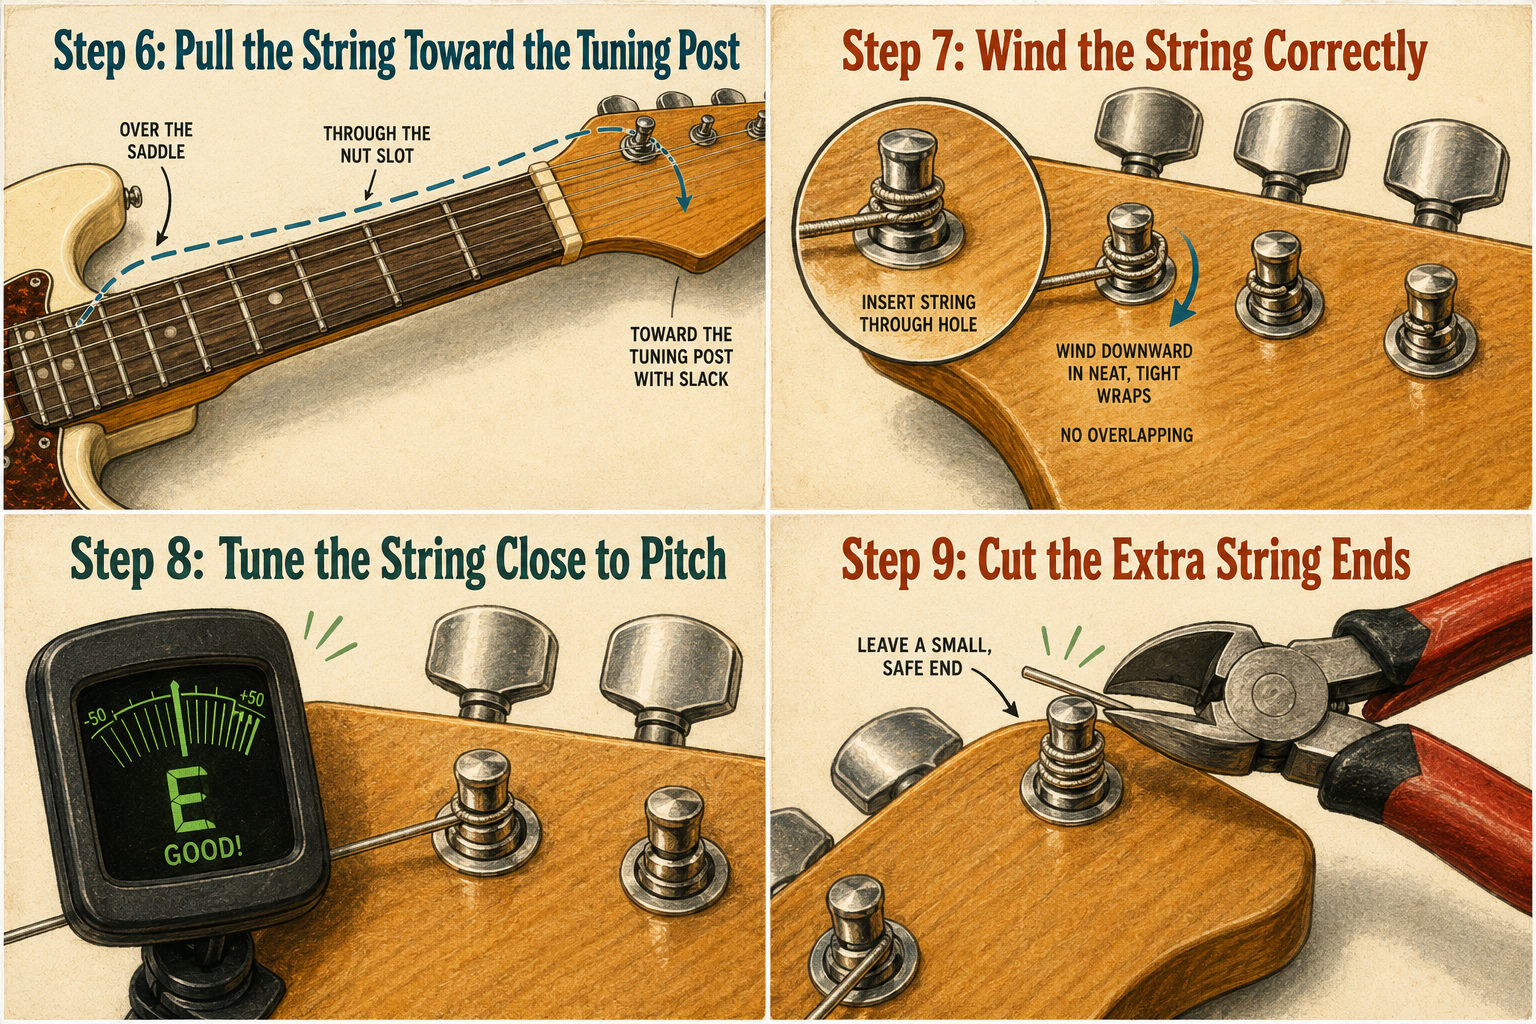
Step 6: Pull the String Toward the Tuning Post
Guide the string over the correct bridge saddle, through the correct nut slot, and toward the correct tuning post.
Make sure the string is not twisted and that it sits properly in the nut slot.
Before winding, leave enough slack for several wraps around the tuning post.
A common method is to pull the string tight, then pull it back slightly to create slack.
General slack guideline
- Low E string: about 1–2 tuning post distances of slack
- A and D strings: about 1.5–2 post distances
- G, B, high E strings: about 2–3 post distances
Thinner strings usually need more wraps than thicker strings.
Do not leave too much slack. Too many wraps can cause tuning instability.
Step 7: Wind the String Correctly
Insert the string through the tuning post hole. Then begin winding.
The string should wind downward on the tuning post, with each wrap going below the previous wrap. This creates a proper break angle over the nut and helps tuning stability.
Important winding tips
- Wind neatly
- Keep tension on the string while winding
- Make wraps go downward
- Avoid overlapping wraps
- Do not leave too many wraps
- Make sure the string exits toward the nut correctly
For most guitars, the string should wind toward the inside of the headstock, but this depends on tuner layout.
A clean winding job helps the guitar stay in tune better.
Step 8: Tune the String Close to Pitch
After winding the string, tune it close to the correct pitch.
Do not worry if it goes out of tune quickly at first. New strings stretch and settle during the first few minutes.
Tune gradually and make sure the string is seated correctly at:
- Bridge saddle
- Nut slot
- Tuning post
- String tree if your guitar has one
Repeat the process for each string.
Step 9: Cut the Extra String Ends
Once each string is installed and tuned close to pitch, cut the excess string near the tuning post.
Leave a small amount of string end, but do not leave long sharp ends sticking out.
Be careful with the cut ends. They are sharp and can scratch the headstock or hurt your fingers.
Some players prefer cutting after fully stretching and tuning the strings. That is also fine.
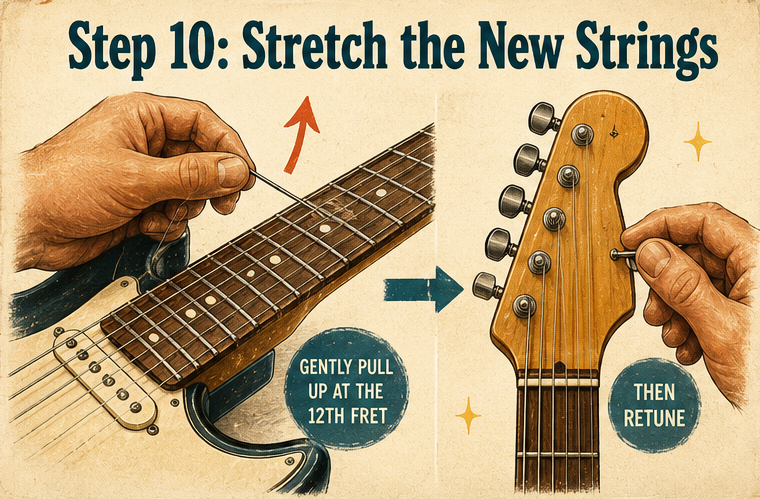
Step 10: Stretch the New Strings
New strings need to stretch and settle.
If you skip this step, the guitar may go out of tune repeatedly after you start playing.
How to stretch strings safely
- Tune the guitar to pitch.
- Gently pull one string upward around the 12th fret area.
- Move along the string and gently stretch different points.
- Retune the string.
- Repeat until the string holds pitch better.
Do not pull too hard. You are trying to settle the string, not damage it.
Stretch all six strings, then retune again.

Step 11: Tune the Guitar Again
After stretching, tune the guitar carefully.
Use an electronic tuner for accuracy.
Tune each string to pitch:
Standard tuning:
E A D G B E
From lowest string to highest string:
- 6th string: E
- 5th string: A
- 4th string: D
- 3rd string: G
- 2nd string: B
- 1st string: E
After tuning all strings, check them again. Adjusting one string can slightly affect the others, especially on tremolo guitars.
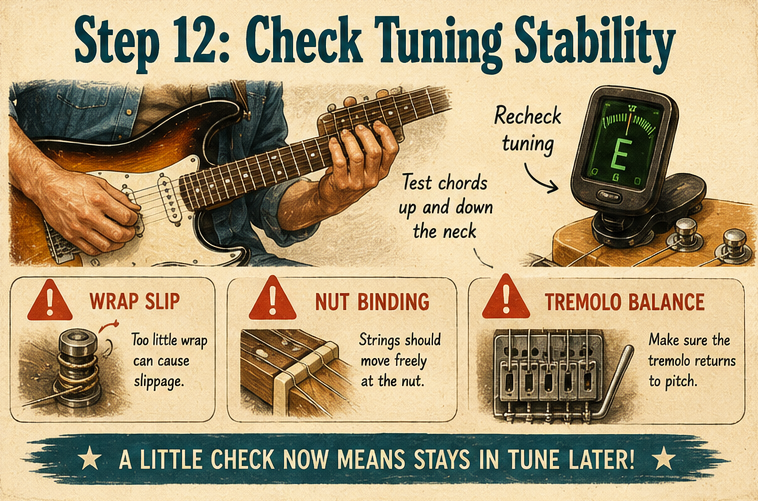
Step 12: Check Tuning Stability
Play a few chords, bend some strings, and tune again.
If the guitar keeps going flat, the strings may still be stretching or the wraps may be slipping.
If the guitar goes sharp or makes a “ping” sound while tuning, the string may be binding in the nut slot.
Possible tuning stability issues include:
- Too many wraps around the tuning post
- Overlapping string wraps
- String not seated properly
- Nut slot too tight
- Tremolo bridge imbalance
- Old or unstable tuners
- Strings not stretched enough
A clean string installation solves many tuning problems.
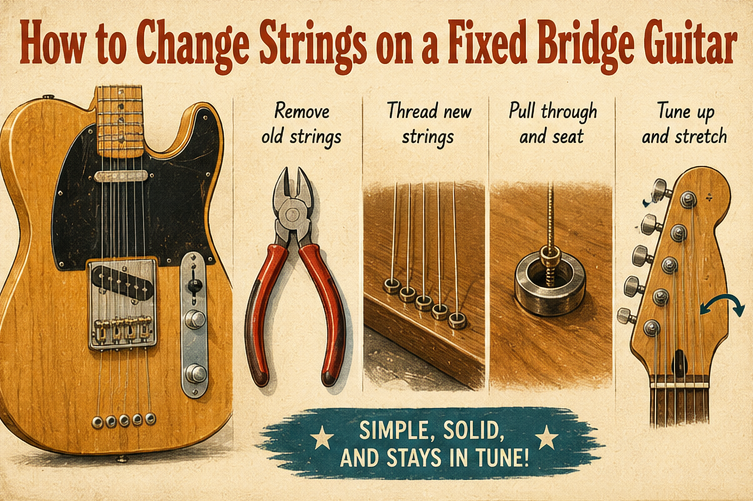
How to Change Strings on a Fixed Bridge Guitar
A fixed bridge is one of the easiest bridge types to restring.
Basic process:
- Loosen old strings.
- Remove old strings from the bridge.
- Clean the guitar.
- Insert new strings through the bridge or body.
- Pull strings to the tuning posts.
- Wind neatly downward.
- Tune, stretch, and retune.
Fixed bridge guitars are beginner-friendly because the bridge does not move when string tension changes.

How to Change Strings on a Tune-o-Matic Bridge
Tune-o-matic guitars usually have a bridge and stop tailpiece.
When removing all strings, the bridge and tailpiece may become loose. Be careful not to let them fall.
Basic process:
- Loosen old strings.
- Remove strings from the tailpiece.
- Keep the bridge and tailpiece in place.
- Insert new strings through the tailpiece.
- Guide strings over the correct saddles.
- Wind at the tuning posts.
- Tune and stretch strings.
Make sure each string sits in the correct saddle groove.

How to Change Strings on a Tremolo Bridge
A tremolo bridge can be slightly more complicated because string tension affects bridge position.
For standard tremolo guitars, you can change all strings at once if you are comfortable, but beginners may prefer changing one string at a time.
Basic process:
- Replace one string at a time if the bridge is floating.
- Feed the string through the tremolo block or bridge.
- Seat the ball end properly.
- Wind the string neatly.
- Tune gradually.
- Repeat for all strings.
- Stretch strings and retune several times.
- Check bridge angle.
If the bridge angle changes a lot after changing string gauge, the tremolo springs may need adjustment.
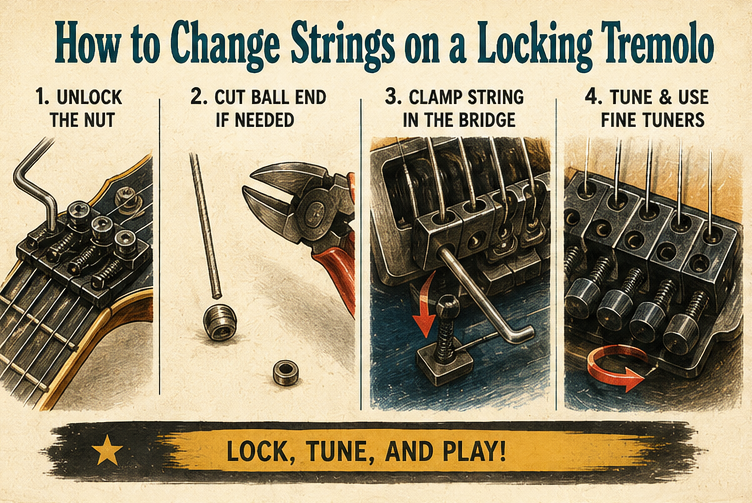
How to Change Strings on a Locking Tremolo
Locking tremolo systems are more complex than standard bridges.
Common locking tremolo systems require strings to be clamped at the bridge and locked at the nut.
Basic process:
- Unlock the locking nut.
- Set fine tuners near the middle of their range.
- Loosen old strings.
- Remove strings from bridge clamps.
- Cut off the ball end of each new string if required.
- Insert the string into the bridge saddle.
- Tighten the saddle block carefully.
- Wind the string at the tuner.
- Tune all strings.
- Stretch strings.
- Lock the nut.
- Use fine tuners for final tuning.
Locking tremolos require patience. Small changes affect the entire bridge balance.
If you are new to guitar maintenance, take photos before removing strings.
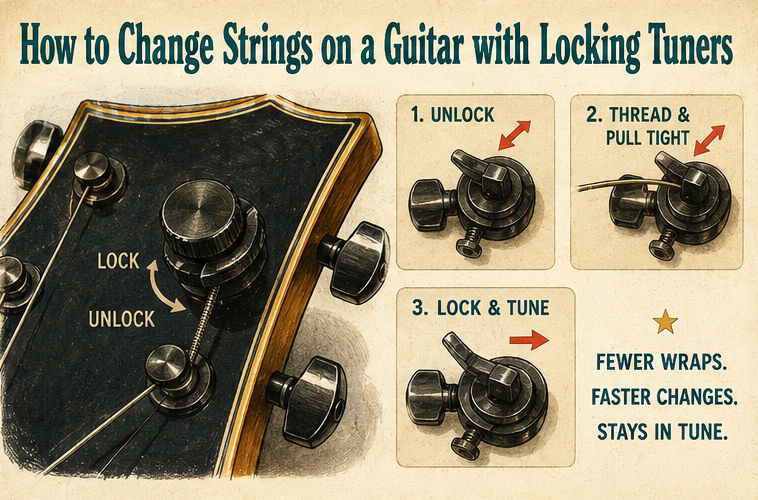
How to Change Strings on a Guitar with Locking Tuners
Locking tuners make string changes faster and cleaner.
Unlike standard tuners, locking tuners clamp the string inside the tuning post, so you need fewer wraps.
Basic process:
- Insert the string through the bridge.
- Pull the string through the locking tuner.
- Pull it fairly tight.
- Lock the tuner.
- Tune to pitch.
- Cut the excess string.
- Stretch and retune.
With locking tuners, you usually need less than one full wrap around the tuning post.
This can improve tuning stability and make restringing easier.
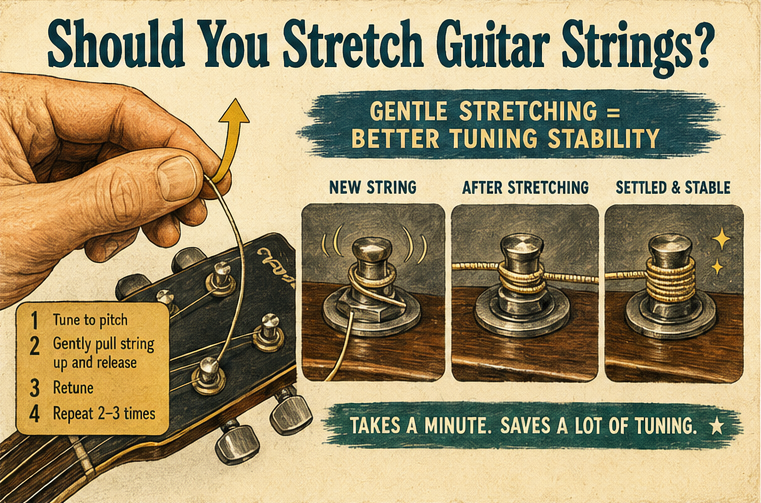
Should You Stretch Guitar Strings?
Yes. Stretching new strings is important.
New strings continue to settle after installation. Without stretching, they may go flat repeatedly while playing.
Stretching helps:
- Stabilize tuning
- Seat the strings at the bridge
- Seat the strings at the tuning posts
- Reduce slipping
- Improve tuning confidence
Do not pull aggressively. Gentle, repeated stretching is better than one hard pull.
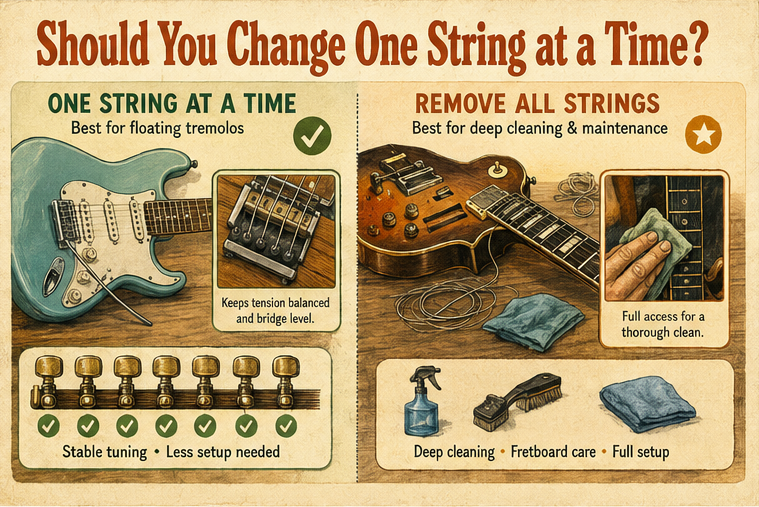
Should You Change One String at a Time?
Changing one string at a time can be useful for guitars with floating bridges.
It helps maintain tension and keeps the bridge closer to its original position.
Good reasons to change one string at a time
- Floating tremolo guitar
- Beginner restringing
- You do not need deep cleaning
- You want to avoid bridge movement
- You want a faster, safer process
Good reasons to remove all strings
- Deep cleaning
- Fretboard conditioning
- Fret polishing
- Bridge cleaning
- Fixed bridge guitar
- Setup inspection
Both methods are valid.
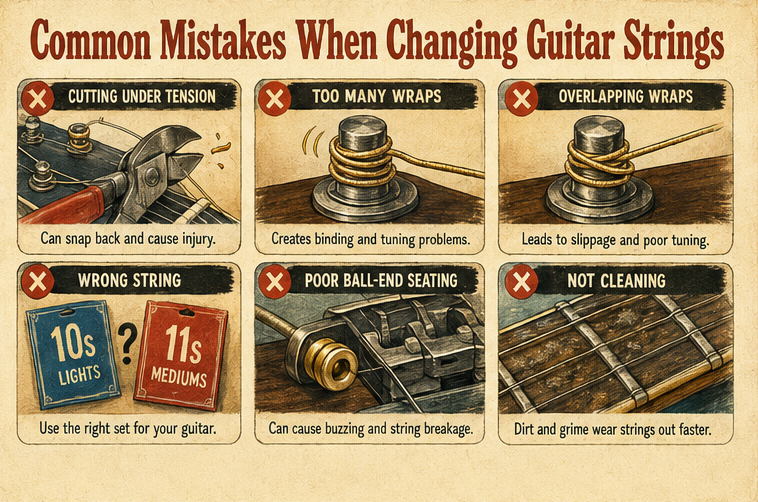
Common Mistakes When Changing Guitar Strings
Cutting strings before loosening them
Always loosen strings before cutting. Cutting a string under tension can be dangerous.
Using too many wraps
Too many wraps can cause tuning instability. Keep wraps neat and controlled.
Overlapping wraps
String wraps should not pile over each other. They should wind downward neatly.
Not stretching new strings
Unstretched strings will go out of tune repeatedly.
Installing the wrong string in the wrong position
Always check the string gauge before installing.
Not seating the ball end properly
If the ball end is not seated, the string may slip later.
Cutting the string too short before winding
Do not cut the string before it is securely installed, unless you are using a locking tremolo system that requires it.
Ignoring the nut
If the string catches in the nut slot, tuning stability will suffer.
Forgetting to clean while strings are off
String changes are the best time to clean hard-to-reach areas.
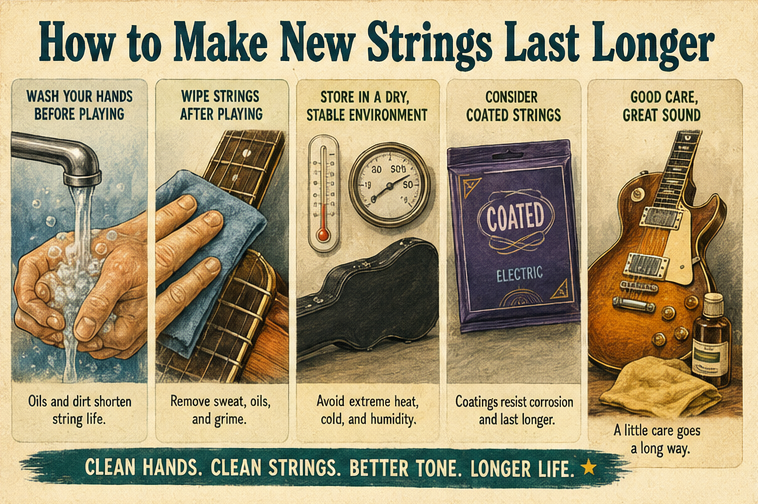
How to Make New Strings Last Longer
Fresh strings sound and feel best when you take care of them.
To make strings last longer:
- Wash your hands before playing
- Wipe strings after every session
- Store the guitar in a clean, dry place
- Use coated strings if you sweat heavily
- Avoid touching strings with dirty hands
- Keep the fretboard clean
- Use a string cleaner if desired
- Keep humidity stable
- Change strings before they rust badly
A quick wipe after playing can extend string life significantly.
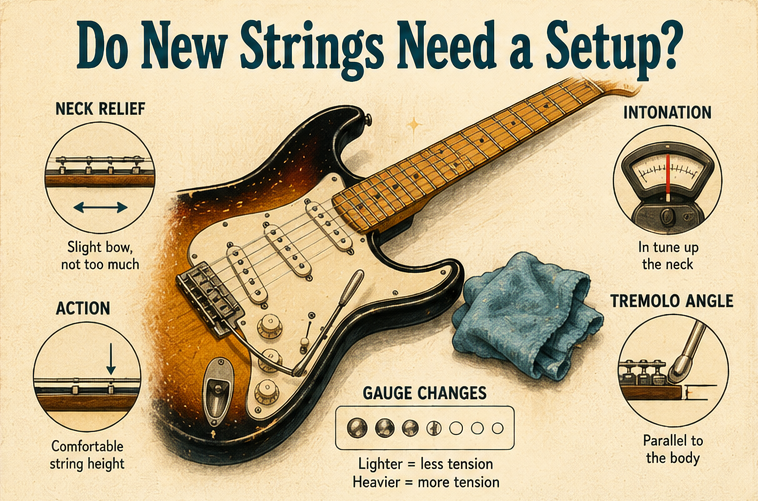
Do New Strings Need a Setup?
If you replace your strings with the same gauge and tuning, your guitar may not need a full setup.
However, if you change string gauge or tuning, setup adjustments may be needed.
You may need a setup if:
- You switch to heavier strings
- You switch to lighter strings
- You tune lower than before
- The neck relief changes
- The action feels different
- The intonation is off
- The tremolo bridge angle changes
- The guitar starts buzzing
- Bends choke out
Changing strings is simple, but changing tension can affect the whole guitar.

Best Guitar Strings for Beginners
Beginners usually benefit from lighter or balanced string gauges.
For electric guitar beginners, good choices include:
- .009–.042 for easier bending
- .010–.046 for a balanced feel
If your fingers are still developing strength, lighter strings can make learning easier.
However, do not choose strings only because they are easy. Choose a gauge that matches your playing style, tuning, and guitar setup.
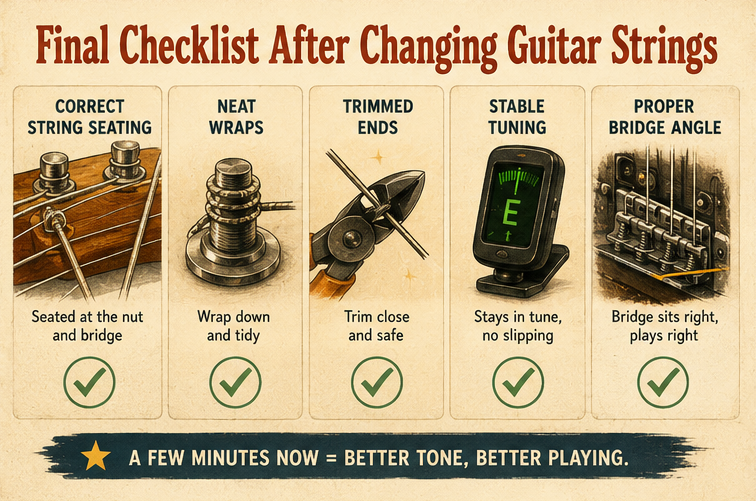
Final Checklist After Changing Guitar Strings
After installing new strings, check the guitar carefully.
Make sure:
- Each string is in the correct position
- Ball ends are seated properly
- Strings sit correctly in bridge saddles
- Strings sit correctly in nut slots
- Wraps are neat and downward
- Extra string ends are trimmed
- Strings are stretched
- Guitar is tuned to pitch
- Tuning is stable after bends
- Bridge angle looks correct
- Guitar feels comfortable
- No unusual buzzing appears
Play open chords, barre chords, bends, and a few riffs across the neck. The guitar should feel cleaner, brighter, and more responsive.
Changing Strings Makes Your Guitar Feel New Again
Changing guitar strings is a basic skill, but it makes a huge difference.
Fresh strings improve tone, feel, tuning stability, and playing enjoyment. They make chords clearer, bends smoother, and the guitar more responsive. A clean restring also gives you the chance to inspect and maintain the instrument.
For beginners, changing strings may feel intimidating the first time. But after doing it a few times, it becomes simple and routine.
The key is to work slowly, use the right string gauge, wind the strings neatly, stretch them properly, and tune carefully.
A guitar with fresh strings feels more alive. If your guitar sounds dull, feels rough, or no longer inspires you, a new set of strings may be the easiest and most affordable upgrade you can make.