

Hardware & Playability
Fixed Bridge vs Tremolo Bridge: Complete Electric Guitar Guide

The bridge is one of the most important parts of an electric guitar. It supports the strings, helps control intonation and action, and strongly affects tuning stability and playing feel.
Two of the most common bridge types are the fixed bridge and the tremolo bridge.
A fixed bridge stays in one position and focuses on stability, simplicity, and sustain. A tremolo bridge allows the player to change pitch using a tremolo arm, creating vibrato, dives, and expressive effects.
Neither design is automatically better. The right choice depends on your music, playing style, maintenance preferences, and tuning needs.
What Is a Fixed Bridge?
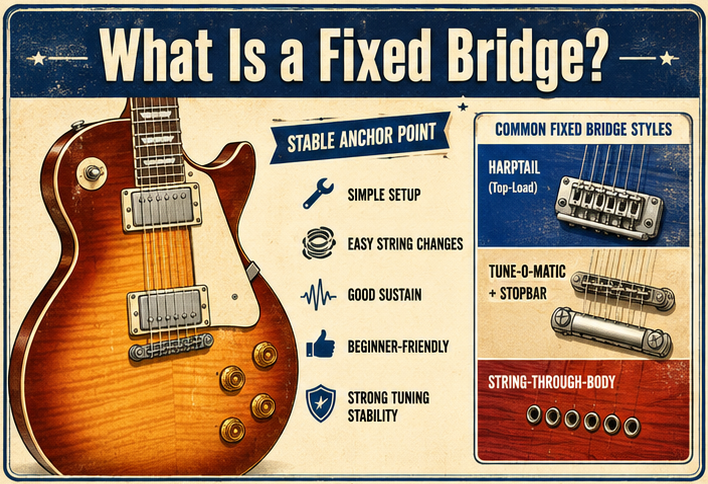
A fixed bridge is mounted firmly to the guitar body and does not move during normal playing.
The strings remain anchored at a stable point, which helps the guitar stay in tune. Fixed bridges are common on many rock, metal, blues, jazz, and beginner guitars.
Common fixed bridge designs include:
- Hardtail bridges
- Tune-o-matic bridges
- String-through-body bridges
- Wraparound bridges
- Fixed modern saddles
Because the bridge does not move, setup and string changes are usually straightforward.
Fixed bridge characteristics
Fixed bridges are known for:
- Strong tuning stability
- Simple maintenance
- Easy string changes
- Stable alternate tunings
- Good sustain
- Consistent string tension
- Reliable intonation
- Beginner-friendly operation
A fixed bridge is often the safest option for players who want a dependable guitar without additional adjustment.

What Is a Tremolo Bridge?
A tremolo bridge can move when the player pushes or pulls a tremolo arm.
This movement changes string tension and temporarily raises or lowers the pitch. Despite the common name “tremolo,” the effect is technically vibrato because it changes pitch rather than volume.
Common tremolo systems include:
- Vintage six-screw tremolo
- Two-point tremolo
- Floating tremolo
- Locking tremolo
- Bigsby-style vibrato
- Double-locking systems
Some tremolo bridges only lower pitch, while fully floating systems can raise and lower pitch.
Tremolo bridge characteristics
Tremolo bridges are known for:
- Pitch-bending effects
- Vibrato and expressive movement
- Dive bombs
- Subtle chord shimmer
- Surf and vintage effects
- Modern lead techniques
- Greater creative flexibility
- More complex setup requirements
A tremolo bridge gives the player more expression, but it also requires more maintenance and careful adjustment.

Fixed Bridge vs Tremolo Bridge: Main Differences
| Feature | Fixed Bridge | Tremolo Bridge |
|---|---|---|
| Movement | Does not move | Moves with tremolo arm |
| Tuning stability | Usually excellent | Depends on setup and design |
| String changes | Easier | More complicated |
| Alternate tunings | Very easy | Can disturb bridge balance |
| Maintenance | Low | Medium to high |
| Pitch effects | Not available | Available |
| Beginner-friendly | Very good | Depends on tremolo type |
| Best for | Stability and simplicity | Expression and pitch control |
Simple summary:
Fixed bridge = stability, simplicity, and reliability
Tremolo bridge = expression, movement, and tonal effects

Tuning Stability
Tuning stability is one of the biggest differences between the two systems.
A fixed bridge usually stays in tune more easily because the bridge does not move. This makes it ideal for strong string bending, aggressive rhythm playing, alternate tunings, and live performance.
A tremolo bridge can also stay in tune well, but it must be set up correctly. The nut, tuners, bridge, strings, and spring tension all need to work together.
Locking tremolo systems can provide excellent tuning stability once properly adjusted. However, they are more complex than fixed bridges.
Choose a fixed bridge if tuning stability is your top priority.
String Changes and Maintenance
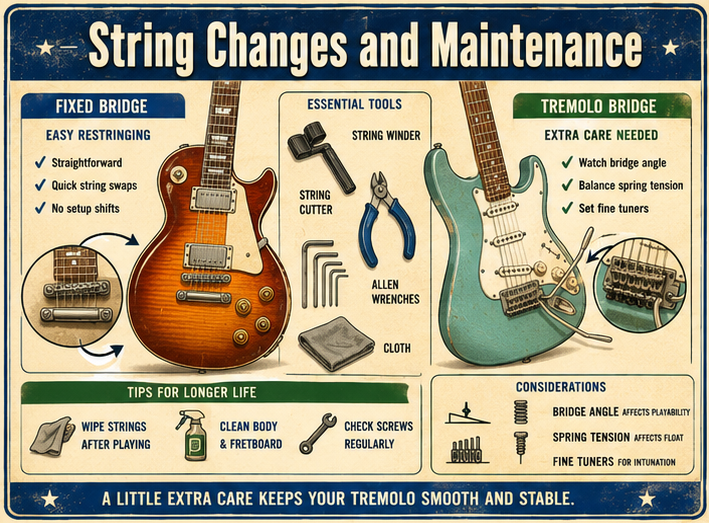
Fixed bridges are generally easier to restring.
You can usually remove all strings, install a new set, tune the guitar, and make minor adjustments if necessary.
Tremolo bridges require more attention because string tension affects bridge position. On a floating tremolo, changing string gauge or tuning can cause the bridge to tilt forward or backward.
Locking tremolos may also require:
- Unlocking the nut
- Cutting string ball ends
- Adjusting fine tuners
- Balancing spring tension
- Resetting bridge angle
For beginners, a fixed bridge or simple non-floating tremolo is usually easier to manage.

Alternate Tunings
Fixed bridges are much better for players who frequently change tunings.
You can move from standard tuning to Drop D or another lower tuning without affecting the bridge position.
On a floating tremolo, changing one string’s tension affects all the other strings. Lowering one string may cause the remaining strings to go sharp.
Players who regularly use several tunings often prefer:
- Fixed bridges
- Decked tremolos
- Blocked tremolos
- Multiple guitars for different tunings
If alternate tuning flexibility matters, a fixed bridge is usually the better choice.
Sustain and Tone
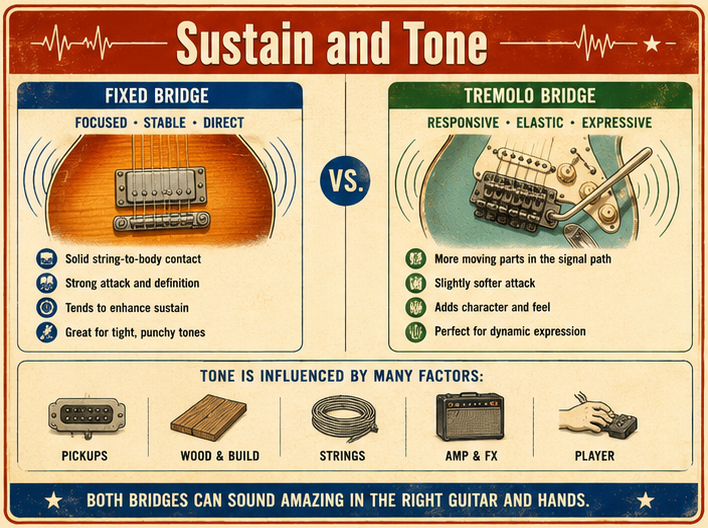
Fixed bridges are often associated with a direct, solid, and sustaining feel because the strings are firmly anchored to the body.
Tremolo bridges may feel slightly more elastic because the springs and moving bridge respond to string tension.
However, bridge type is only one part of the guitar’s tone. Pickups, body construction, scale length, strings, hardware, setup, and amplifier choice also matter.
General tendencies:
- Fixed bridge: focused, stable, direct
- Tremolo bridge: responsive, elastic, expressive
A high-quality tremolo guitar can still have excellent sustain.

Which Bridge Is Better for Rock?
Both bridge types work well for rock.
Choose a fixed bridge if you want:
- Strong rhythm tone
- Stable tuning
- Simple maintenance
- Easy alternate tunings
- Classic hard rock reliability
Choose a tremolo bridge if you want:
- Expressive lead playing
- Vibrato effects
- Classic rock pitch movement
- Modern solo techniques
For rhythm-focused rock, fixed bridges are often more practical. For lead players, tremolo bridges can add more expression.

Which Bridge Is Better for Metal?
Metal players use both systems.
Fixed bridges are excellent for:
- Drop tunings
- Tight rhythm playing
- Heavy strings
- Fast string changes
- Simple stage reliability
Locking tremolos are excellent for:
- Dive bombs
- Extreme pitch effects
- Shred
- Technical lead playing
- Aggressive tremolo use
If you play modern rhythm metal, a fixed bridge is often easier. If your style depends on dramatic pitch effects, a locking tremolo is the better choice.

Which Bridge Is Better for Beginners?
For most beginners, a fixed bridge is the easiest option.
It offers stable tuning, simple string changes, and fewer setup problems. Beginners can focus on learning chords, scales, timing, and technique instead of bridge adjustment.
A standard tremolo can still be beginner-friendly if it is set flat against the body or used only for subtle effects.
A fully floating or locking tremolo is usually better for players who understand basic guitar maintenance or specifically need those features.

Which Bridge Is Better for Custom Guitars?
Choose a fixed bridge for a custom guitar if you want:
- Maximum tuning stability
- Alternate tunings
- Simple maintenance
- Strong sustain
- Hardtail reliability
- A clean, minimal design
Choose a tremolo bridge if you want:
- Vibrato effects
- Expressive lead playing
- Dive bombs
- Floating pitch control
- Modern performance features
- A more versatile lead guitar
The bridge should match the purpose of the guitar. A fixed bridge is practical and dependable. A tremolo bridge adds expressive possibilities.
Fixed Bridge or Tremolo Bridge?
A fixed bridge is the best choice for players who value tuning stability, easy maintenance, alternate tunings, and reliable performance.
A tremolo bridge is the better choice for players who want pitch effects, expressive vibrato, dive bombs, and more creative control.
There is no universal winner.
Choose a fixed bridge if you want simplicity and stability. Choose a tremolo bridge if pitch movement is an important part of your playing style.
The best bridge is the one that supports your music without making the guitar harder to use than necessary.
Step 9: Clean the Tuning Machines
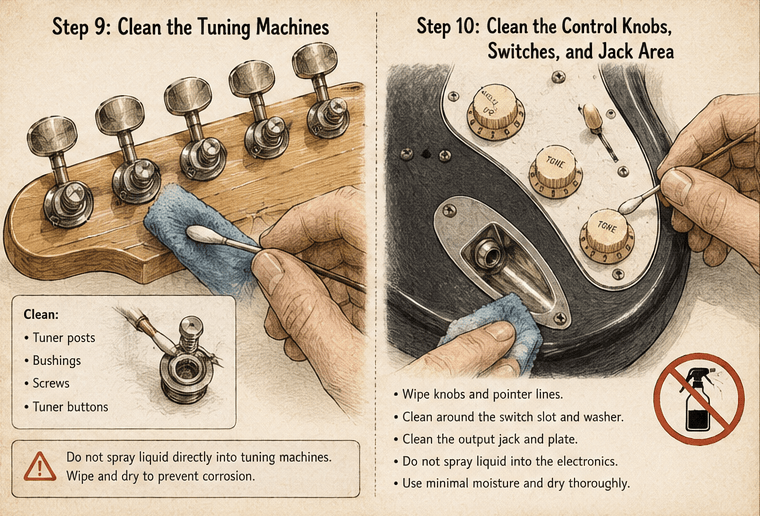
Tuning machines collect dust and fingerprints, especially on the headstock.
Wipe the tuners with a dry microfiber cloth. Use a cotton swab around posts and buttons. If there is grime around the string posts, clean it before installing new strings.
Do not use excessive oil or lubricant unless the tuner requires it. Many modern sealed tuners do not need regular lubrication.
Also check whether tuner screws are loose. If they are, gently tighten them, but do not overtighten.
Step 10: Clean the Control Knobs, Switches, and Jack Area
The control area often collects dust and sweat, especially around knobs and switches.
Use a dry cloth and soft brush around:
- Volume knobs
- Tone knobs
- Pickup selector switch
- Output jack
- Toggle switch washer
- Control plate edges
If a knob is very dirty, you may remove it carefully and clean underneath. Be gentle. Some knobs pull off easily, while others have small set screws.
Avoid spraying cleaner into switches, pots, or the output jack unless you are using a proper electronics contact cleaner and know how to apply it. General guitar polish should never be sprayed into electronics.
If your controls are scratchy or noisy, that may require electronics contact cleaner or professional servicing.
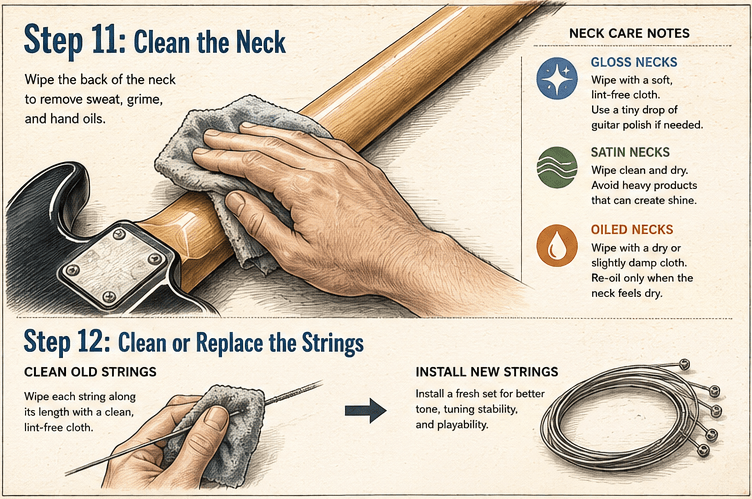
Step 11: Clean the Neck
The back of the neck affects playing comfort more than almost any other area. A sticky neck can make the guitar feel slower and less comfortable.
Gloss necks
Use a microfiber cloth and guitar-safe cleaner. Wipe away sweat and fingerprints. Buff gently.
Satin necks
Use a dry cloth or slightly damp microfiber cloth. Avoid gloss polish, which may create shiny patches.
Oiled necks
Use the correct care method for that specific finish. Some oiled necks may need occasional conditioning, but do not apply random oils without knowing the finish type.
After cleaning, the neck should feel smooth, dry, and comfortable.
Step 12: Clean or Replace the Strings
Old strings can make even a clean guitar feel dull. If your strings are rusty, rough, discolored, or sound lifeless, replace them.
If the strings are still usable, wipe each string with a clean cloth after playing. You can also use a guitar string cleaner if desired.
However, during a deep cleaning session, it is usually best to install a fresh set of strings. New strings make the guitar sound brighter and feel cleaner.
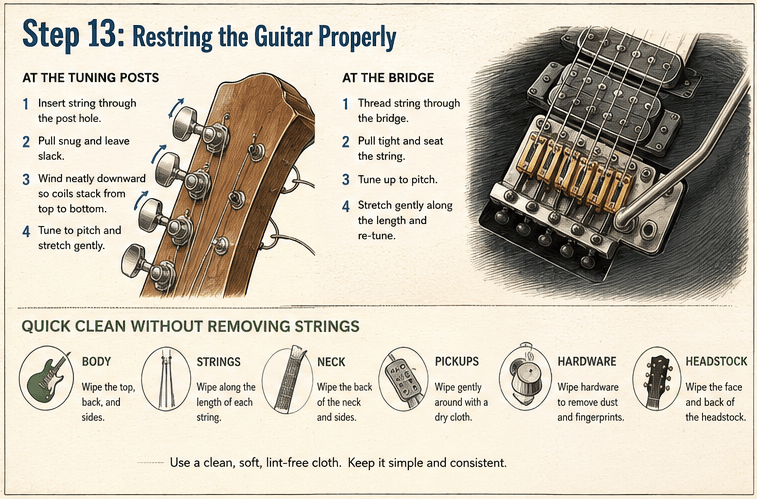
Step 13: Restring the Guitar Properly
After cleaning the body, fretboard, frets, bridge, and hardware, install new strings.
Make sure the strings are seated correctly at the bridge and nut. Wind them neatly around the tuning posts. Stretch the strings gently after tuning to help them settle.
If your guitar has a locking tremolo, follow the correct restringing process for that bridge type.
After restringing, tune the guitar and check:
- String height
- Tuning stability
- Intonation
- Neck relief
- Bridge position
- Nut slots
- Pickup height
A deep clean is a good time to inspect the overall setup.

How to Clean an Electric Guitar Without Removing Strings
Sometimes you may want to clean your guitar quickly without changing strings.
You can still do a basic cleaning:
- Wipe the body with a microfiber cloth.
- Wipe the strings one by one.
- Clean the back of the neck.
- Use a soft brush around pickups and bridge.
- Wipe fingerprints from hardware.
- Clean the headstock and tuners.
You will not be able to clean the fretboard as deeply, but this routine helps keep the guitar fresh between string changes.
How to Clean a Glossy Electric Guitar
Glossy guitars show fingerprints and smudges easily, but they are usually simple to clean.
Use a microfiber cloth and guitar-safe polish. Apply the cleaner to the cloth rather than spraying directly onto the guitar. Wipe gently, then buff with a dry cloth.
Avoid circular rubbing with too much pressure if dust is present. Always remove dust first.
Gloss finishes can look excellent when polished correctly, but over-polishing is unnecessary.
How to Clean a Satin or Matte Electric Guitar
Satin and matte guitars require a different approach.
Do not use regular guitar polish unless it is specifically safe for matte finishes. Polishing a matte guitar can create shiny spots that are difficult or impossible to reverse.
Use a dry microfiber cloth for regular cleaning. For stubborn marks, use a slightly damp cloth and dry immediately.
The goal is to clean the surface, not buff it to a shine.
How to Clean a Guitar with a Nitro Finish
Nitrocellulose lacquer finishes are delicate and require special care.
Use only nitro-safe cleaning products. Avoid alcohol, household cleaners, strong solvents, and aggressive polishing. Do not leave the guitar in contact with rubber, vinyl, or certain plastics for long periods, as they may react with nitro finishes.
For regular care, a soft dry cloth is often enough.
Nitro finishes age naturally and may develop checking, wear, and color changes over time. Many players appreciate this, but it also means the finish needs gentler care.
How to Clean Gold Hardware
Gold hardware looks beautiful but can wear more easily than chrome or nickel hardware. The gold plating can be thin, so aggressive polishing may remove the finish.
Use a soft dry microfiber cloth. Avoid abrasive metal polish. If needed, use a very mild guitar-safe cleaner and wipe gently.
Do not scrub gold hardware. Prevention is better than restoration. Wipe it down after playing to remove sweat and fingerprints.
How to Remove Stickiness from a Guitar Neck
A sticky neck can be caused by sweat, dirt, glossy finish friction, or old residue.
Start with a clean microfiber cloth. If needed, use a small amount of guitar-safe cleaner. For satin necks, avoid polish. For gloss necks, gentle cleaning and buffing may help.
If the neck still feels sticky, the issue may be the finish itself rather than dirt. Some players prefer satin necks because they feel faster and less sticky.
Do not sand the neck unless you understand the risks. Sanding can permanently alter the finish and reduce resale value.
How to Remove Grime from the Fretboard
Fretboard grime often builds up next to frets. This is especially common on rosewood, ebony, and pau ferro fretboards.
Use a soft cloth, cotton swabs, or a soft brush. Work carefully along the fret edges. If needed, apply a small amount of fretboard cleaner.
After cleaning an unfinished fretboard, apply a very light amount of conditioner and wipe away all excess.
Avoid soaking the wood. Too much liquid can cause problems.
Should You Use Lemon Oil on a Guitar Fretboard?
Lemon oil can be useful, but only in the right situation.
Use guitar-specific lemon oil or fretboard conditioner on unfinished rosewood, ebony, pau ferro, or similar fretboards. Use it sparingly.
Do not use lemon oil on finished maple fretboards. Do not use furniture lemon oil. Do not over-apply it.
A small amount a few times per year is usually enough. If the fretboard already looks healthy, you may not need oil at all.
Should You Use Water to Clean a Guitar?
Water should be used very carefully.
A slightly damp microfiber cloth can be safe for some cleaning tasks, but the cloth should not be wet. Water should never be allowed to pool around frets, pickups, bridge screws, unfinished wood, electronics, or cracks in the finish.
Always dry the area immediately after using a damp cloth.
For most cleaning tasks, a dry cloth or guitar-safe cleaner is better.
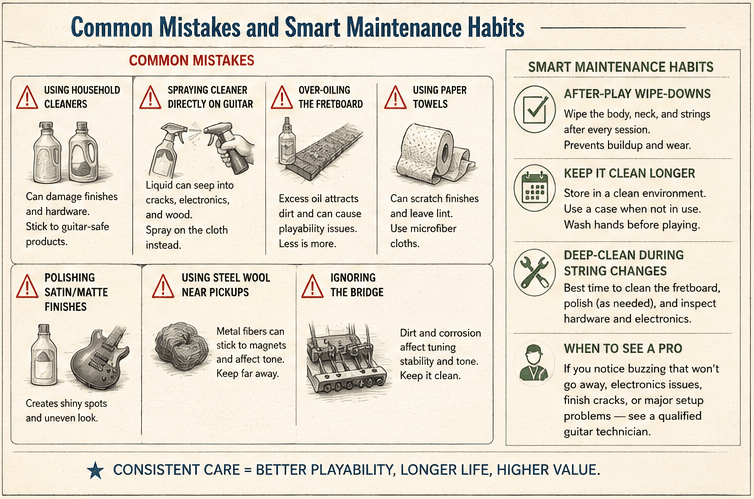
Common Mistakes When Cleaning an Electric Guitar
Cleaning a guitar is simple, but mistakes can cause damage.
Using household cleaners
Household cleaners may contain chemicals that damage guitar finishes or leave residue.
Spraying cleaner directly onto the guitar
Cleaner can run into pickups, electronics, bridge holes, or seams. Always apply cleaner to the cloth first.
Over-oiling the fretboard
Too much oil can create residue, attract dirt, and affect the wood.
Using paper towels
Paper towels can create fine scratches on glossy finishes.
Scrubbing gold hardware
Gold plating can wear off if cleaned aggressively.
Polishing satin finishes
Polish can create shiny spots on matte or satin guitars.
Using steel wool near pickups
Steel wool particles are magnetic and can stick to pickups.
Ignoring the bridge
The bridge collects sweat and grime and should be cleaned regularly.
Leaving old strings on after deep cleaning
Old strings can make a freshly cleaned guitar still feel dirty and dull.
Quick Cleaning Routine After Playing
A quick routine can prevent most buildup.
After each session:
- Wipe the strings.
- Wipe the fretboard area.
- Wipe the back of the neck.
- Wipe the body where your arm rests.
- Wipe fingerprints from hardware.
- Store the guitar properly.
This takes less than two minutes and helps your strings, finish, and hardware last longer.
Deep Cleaning Routine During String Changes
When changing strings, use the opportunity to do a deeper clean.
A good deep cleaning routine:
- Remove the strings.
- Dust the entire guitar.
- Clean the body.
- Clean the fretboard.
- Polish the frets if needed.
- Clean pickups and bridge.
- Wipe tuning machines.
- Clean controls and jack area.
- Condition unfinished fretboard if needed.
- Install new strings.
- Tune and check setup.
This routine keeps your electric guitar looking, feeling, and performing its best.
How to Keep Your Guitar Clean Longer
Cleaning is easier when you prevent buildup.
To keep your guitar cleaner:
- Wash your hands before playing
- Wipe the guitar after each session
- Store it in a case or covered stand
- Avoid leaving it in humid or dusty areas
- Change strings regularly
- Use a clean strap
- Avoid eating while playing
- Keep drinks away from the guitar
- Use a proper guitar stand
- Maintain stable humidity
Small habits make a big difference over time.
When Should You Take Your Guitar to a Professional?
Basic cleaning can be done at home, but some problems are better handled by a guitar technician.
Consider professional help if:
- The electronics are noisy
- The bridge is heavily rusted
- Frets are deeply worn
- The fretboard is cracked
- The finish is damaged
- Hardware screws are stripped
- The guitar has tuning stability problems
- The neck needs adjustment
- You are unsure about cleaning a valuable or vintage guitar
A professional setup and cleaning can make an older guitar feel much better.
Final Thoughts: A Clean Guitar Plays Better
Cleaning your electric guitar is one of the simplest ways to protect your instrument and improve your playing experience. A clean body looks better, a clean neck feels faster, clean frets make bends smoother, and fresh strings bring your tone back to life.
You do not need complicated tools or expensive products. The most important things are consistency, gentle technique, and using guitar-safe materials.
For everyday care, wipe your guitar after playing. For deeper maintenance, clean it during string changes. Pay attention to the fretboard, frets, bridge, pickups, and hardware. Avoid harsh cleaners, excessive moisture, and aggressive polishing.
A well-maintained electric guitar will not only last longer. It will feel more inspiring every time you pick it up.